How to Create a Review Website From Scratch?
 Creating a review website requires a simple blog and a genuine interest in writing product reviews to your audience.
It’s not that complicated, and you can start with no tech skills whatsoever!
A review site can be very lucrative and gratifying. Many online marketers are making a full-time income and even six figures per month with a review site!
By helping your audience make better purchase decisions, you have the opportunity to make life-changing affiliate commissions!
Note that you can write both review and non-review articles in your blog. You are free to talk about anything you want, as long as you keep your articles relevant to your audience. In fact, I strongly encourage you to do that!
I decided to create a step by step for those who are interested in creating a review site and make money as an affiliate marketer.
So, let’s get started!
Step 1 – Decide On Your Niche Market

Deciding on your niche market is one of, if not the most important steps.
But what is a niche market?
A niche is a unique segment of a market. In other words, it’s simply a group of people looking for the same solution to a problem or looking for the same hobbies and interests.
For example, when you think about a group of individuals searching for natural healing, that is a niche! When someone is willing to learn how to teach Yoga, that is another niche!
When you think about natural healing, you should be able to identify a variety of products and services related to that niche.
Probiotic supplements, essential oils, and enzymes are all examples of products in the natural healing niche.
When choosing a niche, it’s paramount to pick a topic you are passionate or at least very interested about.
The reason being that you will dedicate a significant portion of your time to research and write articles related to your niche.
If it’s something you have a lot of know-how, that’s even better!
A lot of people get stuck because they think they don’t have any passions and interests that can be profitable. But let me assure you that any niche is profitable!
Here is my advice. Don’t waste days and weeks trying to find the perfect niche for you. Just pick one that suits you best right now, and change later if you want.
Step 2 – Choose a Domain Name, and Hosting
A domain name is going to be your unique web address or URL of your site. You should choose a domain that is:
- Short
- Easy to remember
- Relevant to your subject (niche market)
Personally, I prefer a brandable domain rather than a keyword rich domain. There are more memorable, easy to spell, and provides great flexibility regarding business direction. Examples of brandable domains include Amazon.com, Youtube.com, Flickr.com, and Google.com
Also, give preference to the extension “.com” if you can.
Once you’ve decided on a domain, the next step is to check if it’s available.
Easy!
Go to a registrar like Godaddy.com or Namecheap.com, and search for your domain.
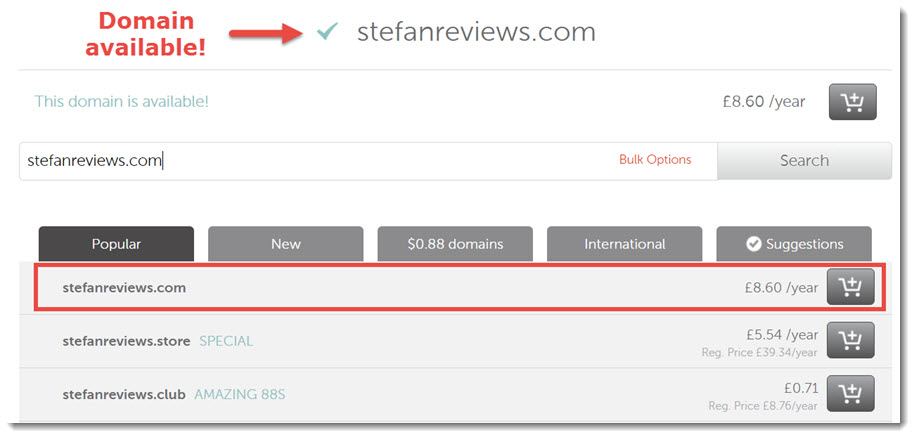
Available domains are usually less than $15/year, which is very affordable!
Now, you are going to have to buy hosting for your domain. You can find very cheap hosting packages being sold by the same registrars for as little as $1 per month.
As a beginner, I hosted my site with Wealthy Affiliate (WA) for 2 years. WA is matched by very few hosts in the industry in terms of quality, security, speed, and support.
For more speed and over 99% uptime, though, I recommend Knownhost. However, you will miss on all the great tools, training and support that WA offers.
I never had a serious problem since I started my website in 2015 and the technical support is excellent.
Step 3 – Install WordPress
So, now that you have a domain and hosting, you have to install WordPress. Here are some reasons why WordPress is the most widely used CMS platform (website creation platform) in the world.
- Easy to use
- Significantly accessible
- Formatting new content is very quick
- Welcoming to your visitors
- Great design flexibility
- SEO friendly
- It’s free!
- And many other reasons
There are many video tutorials on Youtube on how to do that.
The process is similar if you are using another hosting. If you are using Wealthy Affiliate’s hosting, then it’s even more straightforward!
Once you have installed WordPress, you should choose a Theme (layout) and install necessary plugins such as All in One SEO or Yoast and Akismet.
There is a lot to learn about WordPress, and it’s out of the scope of this article. For a step by step video training on how to set up your website and use WordPress, sign up with Wealthy Affiliate. They have an excellent foundation course for free!
Step 4 – Find Products to Review and Promote
There are many websites to search for products in your niche market. If you are promoting mostly physical products, you will probably find a lot of products in your niche for sale on Amazon.
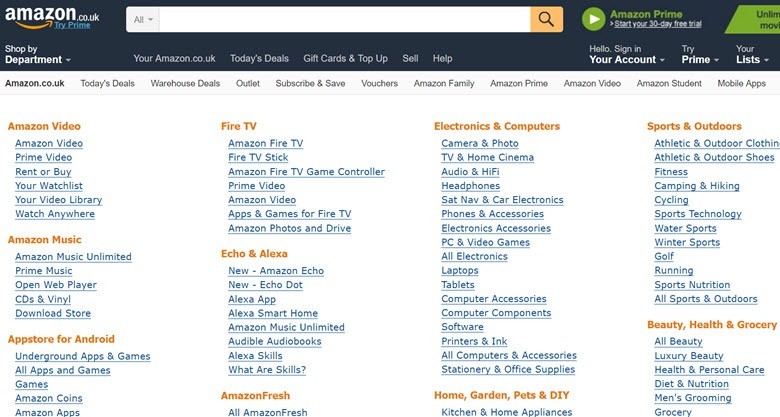
By browsing Amazon’s platform, you will find a plethora of product ideas for your review website.
As you probably know, Amazon is one of the most popular marketplaces on Earth, and many affiliate marketers take advantage of their awesome affiliate program.
You can promote any product and earn commissions when people click on a link to your site and purchase the product directly through Amazon.com.
Commissions vary from 4-10% according to the volume of sales you are responsible for.
You may think it’s too low compared to programs that pay over 50%. However, don’t forget that Amazon’s conversion rate is at 13%, which is very high!
Still, Amazon is just the tip of the iceberg when it comes to finding products to review and promote.
There is also other marketplaces like Commission Junction (CJ), Shareasale, Clickbank, Linkshare, Ebay, Etsy and many others. Not to mention private affiliate programs that can be very lucrative as well.
In order to get your affiliate links and promote the products on your site, you have to sign up for the affiliate program.
It’s advisable that you have a decent amount of content (reviews, informational articles) and some organic traffic before requesting for approval, though. It makes sense because there is no point promoting something in the beginning when you have no visitors to your site.
Step 5 – Write Your Review
There is no set of rules on how to write your reviews, as each person has its own style. Look for other websites in your niche and see how the authors structure and write their reviews. Don’t copy them, just adapt with the things you like.
Don’t copy them, just adapt with the things you like.
These are the things I consider crucial for your articles:
- Be 100% honest
- Keep focused on the topic – avoid unnecessary information.
- Be as thorough as possible
- Use subheading to make it clearer and easier to skim read.
- Use bullet points to get your message across
- Give preference for a conversational language and avoid too much passive voice. No one likes to read complex texts.
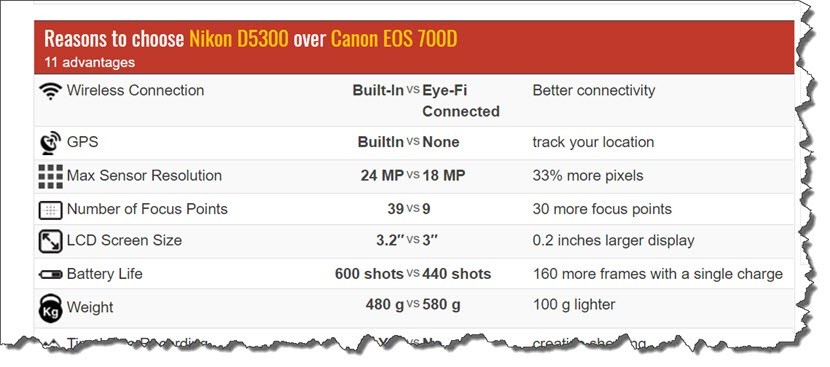
One thing that readers like is the “Pros and Cons” section. It’s an excellent way to summarize all the advantages and disadvantages of the product. Also, you can include a comparison table
This is the basic template that I use for my reviews:
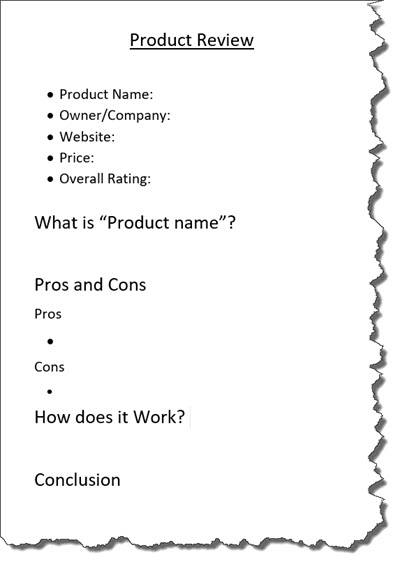
But it’s not always the same. Sometimes I add more subheadings and change the wording when necessary.
Also, you can include a comparison table with all the key features of a type of product.
Don’t Forget About Non-Review Articles!
Keep in mind that your review site should not be restricted to review articles. It’s important to write informational posts and help your audience in every possible way.
Creating non-review articles is beneficial for both your audience and your SEO (search engine optimization). The reason being that when you have lots of informational articles, you can use a wide variety of internal links, directing people to more relevant content.
Google loves internal links!
The more you have them, the more authority Google will assign to your site. As a result, the more your chances of ranking high in the search engines.
Better rankings mean more traffic and more revenue!
Final Thoughts
Many people are benefiting from affiliate marketing by reviewing products on their websites/blogs.
The good thing about reviews is that they are usually easier to rank in search engines like Google and Yahoo.
Besides, they attract people that are in the later stages of the purchase cycle. Thus, they tend to convert better and increase your chances of earning an affiliate commission.
In this article, I just gave you a brief explanation on how to create a review website. I’ve put up what I think is the best strategy to build a long-lasting online business.
If you want a training that will help you take actionable steps towards a highly profitable online business, then look no further than Wealthy Affiliate (WA).
WA is a community-based platform that will give you all you need under the same roof.
- Step-by-step video training
- Access to a community of 800,000 members (live chat and forums)
- Fast and secure hosting service for your site
- Weekly live webinars with an expert in SEO
- And so much more!
[thrive_link color=’green’ link=’https://myroomismyoffice.com/wealthy-affiliate-score-9-7/’ target=’_self’ size=’big’ align=’center’]Read My Full Wealthy Affiliate Review! [/thrive_link]
That’s it for now. I hope this post was valuable to you and I wish you great success in throughout this exciting journey!
If you have any questions or need a hand creating your website, just drop me a message below. I’d love to help you out! 🙂
Your friend
Stefan


